
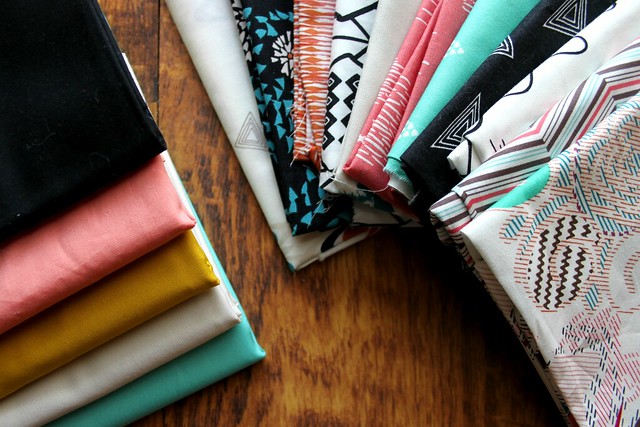
When Pat Bravo's new Etno fabrics arrived at my door, before I could
begin to think of a plan, I had to have more! The Dainty Folk colorway
in rose pink, soft gray, aqua, and black is a beautiful combination, but
seeing them with a punch of Empire Yellow had me wishing for the full
collection!
A week later I had the rest and yesterday I finally found the time to begin my Etno quilt, which began with lots of 18 patch rectangle blocks, made up of 3.5" cuts of each gorgeous Etno print!
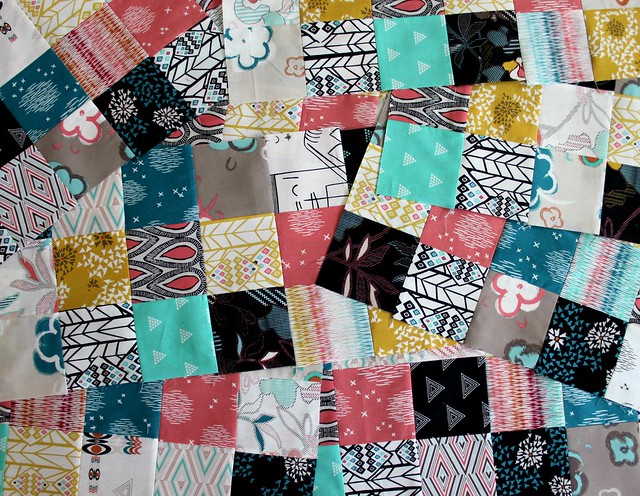
I didn't start out with a new quilt as you go in mind. I had planned to frame my patchwork with the solids shown in the first photo, sewing my blocks together in an alternating horizontal and vertical pattern until I had a finished quilt top. But as I sewed, as per usual, I changed my mind! I took away the solids, added in Prisma Elements in a similar color scheme, and immediately was loving where this was headed!
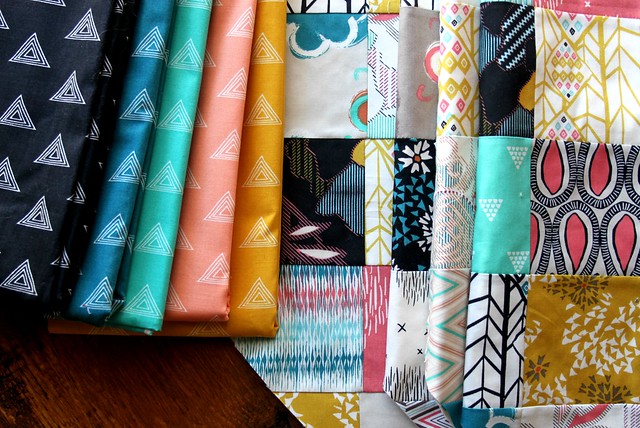
I LOVE these colors together!! Jet Onyx, Pagoda Gem, Larimar Sea, Solar Quartz, and Soft Wulfenite --

For this block I basted my 18 patch center, made up of the 3.5" cuts of Ento prints, onto a 14" square piece of 100% cotton batting on the diagonal. Next I stitch and flip the six colors of Prisma Elements cut into 1.25" strips, working my way from the patchwork edge to the end of each of the two corners, and square up my block to a 13.5" square block. Look how pretty!
I'm so happy that I decided to add in these Prisma Elements. These are with out a doubt my new favorite blender!!

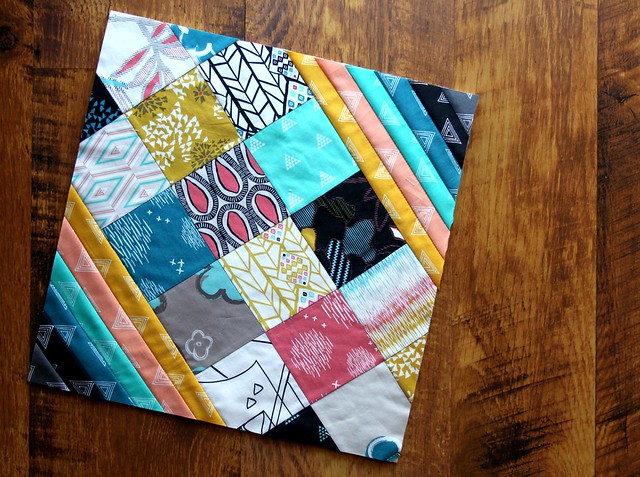
After finishing four blocks, my Criss Cross Diamond pattern started to emerge, I'm so excited!!
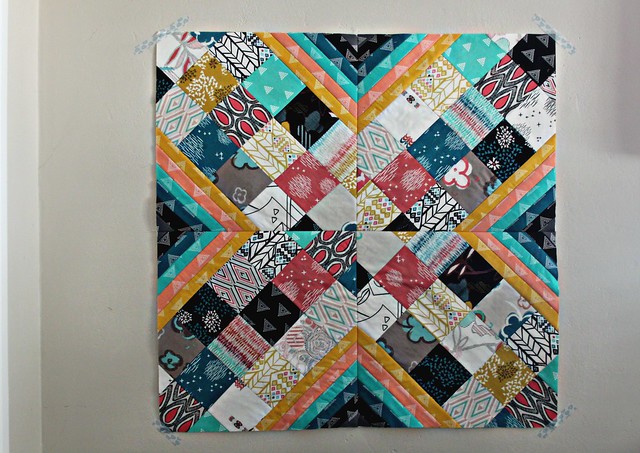
The plan is to make a total of 36 blocks (you can see a peek of what that will look like right here) for a finished quilt measuring a large 78" square! Let me know if you have any questions about my quick, written instructions above or if you'd like to see a tutorial for this qayg block? I'd be willing to take the time to share one, if you're interested. Just let me know!
♡ Maureen
A week later I had the rest and yesterday I finally found the time to begin my Etno quilt, which began with lots of 18 patch rectangle blocks, made up of 3.5" cuts of each gorgeous Etno print!
I didn't start out with a new quilt as you go in mind. I had planned to frame my patchwork with the solids shown in the first photo, sewing my blocks together in an alternating horizontal and vertical pattern until I had a finished quilt top. But as I sewed, as per usual, I changed my mind! I took away the solids, added in Prisma Elements in a similar color scheme, and immediately was loving where this was headed!
I LOVE these colors together!! Jet Onyx, Pagoda Gem, Larimar Sea, Solar Quartz, and Soft Wulfenite --
For this block I basted my 18 patch center, made up of the 3.5" cuts of Ento prints, onto a 14" square piece of 100% cotton batting on the diagonal. Next I stitch and flip the six colors of Prisma Elements cut into 1.25" strips, working my way from the patchwork edge to the end of each of the two corners, and square up my block to a 13.5" square block. Look how pretty!
I'm so happy that I decided to add in these Prisma Elements. These are with out a doubt my new favorite blender!!
After finishing four blocks, my Criss Cross Diamond pattern started to emerge, I'm so excited!!
The plan is to make a total of 36 blocks (you can see a peek of what that will look like right here) for a finished quilt measuring a large 78" square! Let me know if you have any questions about my quick, written instructions above or if you'd like to see a tutorial for this qayg block? I'd be willing to take the time to share one, if you're interested. Just let me know!
♡ Maureen
Love the pattern and the fabric! Quilt as you go is so much fun~
ReplyDeleteThanks for this. Love the colors. Such a simple way but so effective.
ReplyDeleteI love your block! This quilt is going to be outstanding! Personally, I would love a little more in depth instruction on the QAYG. I think it would be great to have the instruction on a quilt I'm going to be making :) I don't know when I'll be able to start, but I really love the looks of this quilt! Thank you for sharing!
ReplyDeleteI love this!
ReplyDeletePictures 5 & 6 will not load for me! Interesting project!
ReplyDeleteMissing pictures 1,3,5 and 6 but still get the drift. So pretty! Did you save the corner cuts??
ReplyDeleteI hope you can see them now! Yes, I saved the corners, they are definitely usable scraps!
DeleteWOW! That is all I have to say.
ReplyDeleteStill missing pictures 1 and 5. Quilt looks great and would appreciate a tutorial since I'm new to the quilting world.
ReplyDeleteI would MC, In my Stash Bee group in September, I get to pick a block, I love string blocks and this would do a repeating pattern I think with any color you used, so folks could use their scraps.. thank you
ReplyDeleteLove this! Tutorial please!
ReplyDeleteOh, and picture one is missing for me. :(
I love the block and would love a tutorial. Thank you.
ReplyDeleteYes love this and a tutorial would be great!!! I love your Quilt as you go pieces!!
ReplyDeleteGorgeous! I would love a tutorial.
ReplyDeleteLove it and would like a tutorial as I'm not sure what you mean when you said you sewed it on a piece of batting on the diagonal. Also, several of the photos say "This photo is no longer available."
ReplyDeleteLove this twist on the quilt as you go. You have definitely inspired me.
ReplyDeleteI would also love a tutorial and I really like this pattern -- do you have a detailed tutorial for this pattern? Also like others have said, some of the photos are not loading properly!
ReplyDeleteWould like a tutorial for this block please, I love the different blocks you design.
ReplyDeleteHi, I would love a tutorial for this block. I am wanting to make a wall hanging for my newly remodeled kitchen and the one you did works to so well that it looks like you chose those colors just for me!!
ReplyDeleteLove this block! Would appreciate a tutorial. Great choice of fabrics.
ReplyDeleteTutorial, please, Maureen! I love this design!! Thanks
ReplyDeleteTutorial, please, Maureen! I love this design!! Thanks
ReplyDeleteThis quilt is amazing. A tutorial would be wonderful. Thanks so much for offering to create it. We all know you're a very busy lady.
ReplyDeleteOf course we would like to have the pdf of the pattern. You do such lovely work.
ReplyDeleteWhat an awesome block Maureen. I'd love to find out more on how you did that block and the QAYG as well. I really love the way this one turned out. Very cool!
ReplyDeleteTutorial pretty please
ReplyDeletePLEASE A TUTORIAL WOULD BE JUST GREAT. SUE
ReplyDeletewould love a tutorial. absolutely beautiful fabric.
ReplyDeleteThe fabric for this quilt is wonderful. Your block is outstanding. You have really captured the fabric with this block. Great!
ReplyDeleteThis comment has been removed by a blog administrator.
ReplyDeleteI really like the effect of those striped corners in these blocks. Wow, lots of seams to match up when sewing together the blocks!
ReplyDeleteMine don't match up perfectly and as my quilt grows it doesn't matter one bit, I love how it's looking!
DeleteYes please, a tutorial would be wonderful. I have been thinking about buying Etno and this has sealed the deal for me.
ReplyDeleteDefinitely would like a tutorial.......love the block....
ReplyDeleteI'd love t o see a true too! I've been jumping in on the QAYG band wages lately and enjoying the ease of peicing together smaller components.
ReplyDeleteCheers
Knowing how to join the pieces for QAYG with no strips would be really helpful. Do you put strips on the back?
ReplyDeleteHi Gene! For sewing QAYG blocks together I already have shared a tutorial that you can see here -- http://maureencracknellhandmade.blogspot.com/2012/10/a-quilt-as-you-go-tutorial.html
DeleteThanks! -Maureen
Lovely Maureen! Question though: how do you quilt your QAYG tops once they are finished?
ReplyDeleteYou are so talented! This quilt is going to be so beautiful. I can't wait to see what you do with the quilting. It would be helpful if you could do a tutorial - I'd certainly use it. Thanks for sharing your gift with us.
ReplyDeleteVery nice. Love the second pattern showing up and showing off!
ReplyDeleteSincerely,
Paula K.
A tutorial on this block would be Awesome! Love the vibrant colors and the finished design was great!
ReplyDeleteYes please! I am in love!
ReplyDeleteI would love a tutorial! I have fabrics that would look awesome, but need the help seeing how to put it together. Thank you!
ReplyDeleteI would love to have a tutorial on how to make this quilt. It is so beautiful.
ReplyDeleteYes, please!
ReplyDeleteI like where this quilt is going. I'm looking forward to seeing the finished project.
ReplyDeletetushay3 (at) yahoo (dot) com
I really love the block and the FB quilt! Keep it going!
ReplyDeleteVERY interested in a detailed how-to :)
ReplyDeleteI always read your blog...but I am not a quilter. I love to sew clothes and have said for a long time that I am just not in to quilting. Every time you post a new quilt I start thinking about it though...I really want to try to QAYG!
ReplyDeleteThat is coming out so pretty! You have such a great eye for mixing.
ReplyDeleteThis is gorgeous. I'd love to see a tutorial.
ReplyDeleteWould dearly love instructions for you Criss Cross Diamond design, so interesting.
ReplyDeleteYou clearly know so much about the subject, you’ve covered so many bases.
ReplyDeleteGreat stuff from this part of the internet. Again, thank you for this blog.
cartier outlet
ReplyDeletenike air huarache
true religion outlet
nike foamposite
coach outlet online
ralph lauren outlet
oakley sunglasses wholesale
rolex watches for sale
christian louboutin outlet
lululemon outlet online
coach outlet
michael kors uk
louis vuitton outlet online
toms outlet
cartier watches
cheap jordans
soccer jerseys wholesale
christian louboutin shoes
hermes belt
swarovski outlet
michael kors wallet
mulberry bags
hermes birkin bag
fitflops sale clearance
adidas outlet
mont blanc pens
rolex uk
ray ban sunglasses sale
cheap nhl jerseys
louboutin pas cher
beats headphones
coach outlet clearance
replica watches
mac cosmetics
nike air max
czq20160712